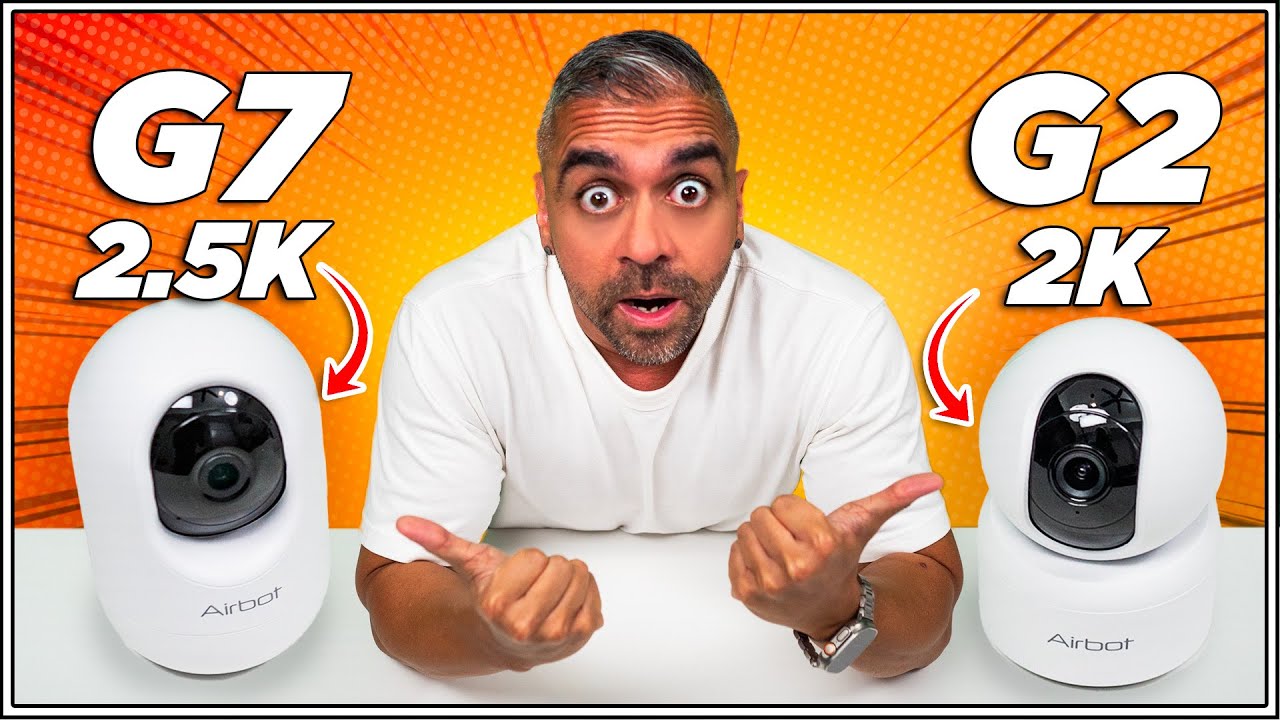
This is the Airbot G2 and the G7, and it starts with a price of only RM79, which is about freaking USD17! These high-resolution cameras will have support for Google Home and Amazon Alexa. So, whether or not you should go with either one of these Wi-Fi cameras.

Unboxing
Now, first let’s unbox the Airbot G2.

In the box, you’ll find a user manual, a charger, a Type-A to Type-C cable, and this cable is generously long, giving you more options for placing your camera and finding the perfect placement. Then there’s a set of screws and a mounting bracket. Finally, the Airbot G2 itself.
[easy-image-collage id=17245]
Then, the unboxing experience for the Airbot G7 is the same but also different.

As you open the box, you’ll immediately see the Airbot G7 camera, and at the bottom is a separate box that includes all the same accessories that the G2 came with. See what I mean? Same, same, but different.

Design & Build
So when it comes to the design and build quality, the Airbot G2 and the G7 have totally different vibes. The G2 has got that cute ball shape, looking like a mini Pokeball. Then the G7 is more pill-like, kind of like those cute characters from Among Us.

These cameras both have a sleek, clean look, mostly dressed in white with a cool black lens. The matte white plastic casing feels very solid and pretty nice to the touch. Not like you’re always touching the cameras, but yeah.

And then both cameras have 360° pan and tilt capabilities with their rotating base, which has the rubber stand to prevent the camera from easily sliding around the surface.

Airbot G2
The G2 camera has a 2K resolution, providing clear images at 3 megapixels. Plus, it has night vision, and since it comes with a panoramic view, there are no sneaky blind spots.

Then it also comes with other cool features like motion detection and tracking. Plus, if you are a smart home enthusiast, it will support Google Home and Amazon Alexa, which will be coming in April this year.

But now you can already link the camera up with the Airbot official app, either by searching it on the Google Play Store or Apple’s App Store or just by scanning the QR code included in the user manual. And yes, I will be diving more into the app later on.

Airbot G7
The G7, on the other hand, comes with all the features that the little brother has but with an upgraded 2.5K resolution at 4 megapixels. This allows for video quality that is just a little clearer and has a little more details.

Performance
Next, let’s look at the performance because they offer solid performance that comes loaded with features that won’t break the bank. The video footage is clear and sharp, making home monitoring seamless. So, no more squinting to find out who’s that.

There’s also a two-way audio feature that has a built-in speaker at the back of both of the cameras. And for the price, this is totally a game changer.


Now, when it comes to tackling the dark, the G2 and the G7’s night vision is quite clear and bright as well, giving you peace of mind even in pitch-black scenarios.

And switching between the regular and the night vision is a breeze in the app for situations where you feel like there is enough light to view the camera feed without activating the night mode.
The built-in motion feature is like a little detective watching for every single movement, and it gives you a notification whenever it senses something in action.

One of the key reasons for you to consider any one of these cameras is the fact that they record locally on a microSD card with up to 128GB of storage. So, you don’t have to pay for additional subscriptions for cloud storage like some other brands usually do. And you can insert the microSD card by just rotating the camera lens where it will reveal the slot.

Now, having facial recognition would be super cool, but given the price, that is totally understandable. But who knows, perhaps a new model, G6 maybe?
App
Now let’s go in-depth on the Airbot app as here is where you’ll need to set up the camera.
After downloading the app, you can either log in or sign up for a new account.

Once that is done, at the home screen of the app, hit the + icon at the top right and add a device. And here’s where I was really surprised by the amount of devices that Airbot has under their ecosystem, which makes me excited to try out their other devices too.
Now for this camera, head to the “Camera & Lock” tab, then select “Indoor PTZ Camera (Wi-Fi)”. Then after some instructions on how to add the camera, you will then need to select your Wi-Fi network and password. And keep in mind that these cameras can only work on a 2.4 GHz Wi-Fi connection, so make sure you choose that.

Next, a QR code will be displayed on your phone, and you’ll need to face the QR code right in front of the camera lens, and you’re connected.
During my first impressions, I was pleasantly surprised at how there was barely any latency on the camera feed.
Then exploring further on the interface of the app, at the top left, you can select to view the feed in HD or SD definition just in case your Wi-Fi speeds are slower than usual.

Then towards the top right, there is a speaker logo to toggle to mute or turn on the volume of the camera feed.

Next to it, there’s a toggle to go full screen on a vertical view.

Then below towards the left bottom of the app, you can select that for a landscape view. Next to that is for you to upload pictures of custom avatars or feedback help.

Then the microphone button next to it sends a voice note to the camera speaker from your phone by pressing and holding that button.

Next to that is a recording toggle to record the video feed manually.

Then towards the bottom right corner is the Features tab, and there are more options over there. Besides the Playback, Gallery, Theme color, and Private mode, you can toggle the Night mode between Auto, Off, or On.

And here’s where there’s also a toggle to turn on motion tracking, which I have to say, that it tracks me really well. And here’s also where you can toggle the motion detection and the sound detection as well.
Next to the Features tab is the cloud storage area tool, and this is in case if you really want to or really need to subscribe to a cloud storage plan which starts at USD4.49, which you don’t have to since you can always opt for recording on the microSD card as mentioned earlier.

Then the Direction tab is where you can manually control the pan and tilt for the camera. And here’s where I was really glad to know that it was super responsive compared to some other expensive options like the Aqara G3, which tends to be a little slower over here.

And the Messages tab is for you to check any notification messages.

Then finally at the three dots at the top right is the settings menu for device information, tap to run, and other automations if you have other Airbot products. Then the private mode toggle turns off the camera feed manually.

Next, under the Basic Function Settings, you can toggle options like flip screen if you mount your camera upside down. There’s a toggle for the time watermark and choose the talk mode between one-way or two-way communication.

Then there are the IR night vision settings here as well as the display settings to adjust the brightness, contrast, and sharpness of the camera if needed. And here’s where you can even tweak the sound detection and the level of the alarm sensitivity and schedule the alarm timer or trigger siren too.

Then finally, there’s the offline notification which is a constant reminder if the camera goes offline for over 30 minutes.
Seriously guys, for the price of this camera, it is a VERY extensive app.
Conclusion
All right, now let’s dive into the nitty-gritty on choosing between the Airbot G2 and the Airbot G7.
Now if you’re all about affordability, then the G2 is your go-to. It packs a 2K resolution, a pan and tilt view, night vision.

And if you crave for crystal-clear video, then the G7 is worth the slightly higher price tag with a sharper 2.5K resolution. So you can probably use a G2 for a brighter environment where the camera is placed. Then for more potentially darker areas, you can use the G7 to ensure the best video or image quality.

But to be honest, because based on the side by side comparison between both of the cameras, the quality is pretty much the same in a more brightly lit environment.

As for the price, as of the time of review, the Airbot G2 camera is currently priced at RM79, which is about USD17, while the G7 is priced at RM89.90, which is about USD19.


Of course, you can get better offers if you shop online through places like Shopee for the additional discount voucher. So yes, with this kind of price, there’s absolutely no reason for you not to get either of these two.
🛒 Get the Airbot G2 & G7 at the link below:-
Shopee (MY) – https://invl.io/clknbyf
Lazada (MY) – https://invol.co/clknbyj