Once again happy New Year to you dear friends, well the hecticness resumes but I LOVE IT!
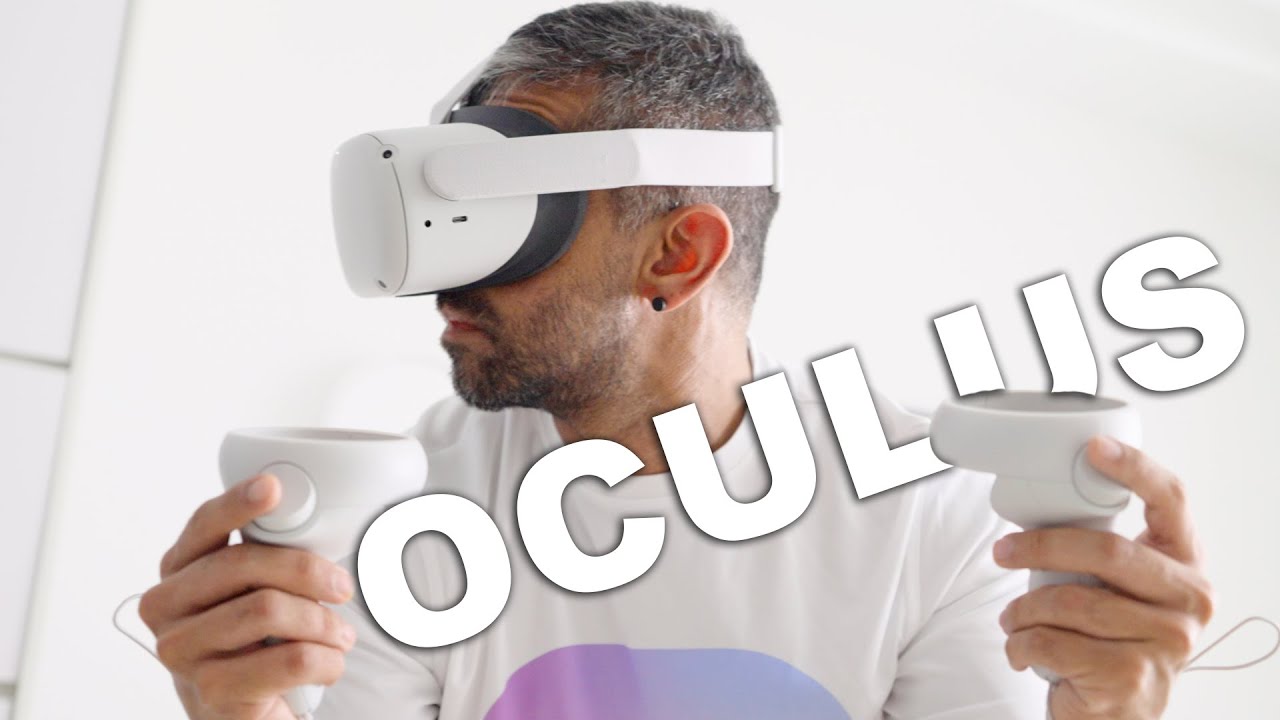
In this review, I am going to feature something that I have never reviewed before, which is the Oculus Quest 2. I will be unboxing, going through the setup process, and most importantly give you my take on this amazing headset.
Before we unbox the Oculus Quest 2, I would like to say thank you Oculus for sponsoring this!
(article continues after the video)
UNBOXING
So the Oculus Quest 2 comes in a nice minimalist white box, with the visuals of the devices on the front of the box.
Then, at the back, there’s the illustration of the exciting games available like Star Wars, Jurassic World and the famous Beat Saber! Also, a disclaimer towards the bottom right which states that you’ll require wireless internet access and also a Facebook account to play and setup.
Then at the top of the box, you’ll have the storage capacity of the Quest 2 which the one I have gotten is the 64GB variant, what comes inside of the box and then the brand logo for Oculus as well.
You will need to slide open the cover, where it will reveal another brown shipping coloured box and opening that, the first thing you see inside is the headset itself.
Also, for those who wear glasses – like me? (yeap, surprise! yes most of you don’t know I wear glasses, yeah I am actually quite blind hehe) there is a glass spacer provided that can help those wearing glasses fit better too, which is pretty cool! So thoughtful of them. Good job Oculus!
Next is the controllers, where like many other gaming controllers out there, there is the triggers, buttons, and thumbsticks. And if you’re wondering what’s that ring on top of the buttons, that is there to help track your hands while you’re in the VR world and what’s cool is that it also comes with a double-A battery pre-packed in each of the controller.
Then you will find a smaller white box which contains the reference and safety guide, a USB-C to USB-C cable, and a USB-C power adapter.
BUILD QUALITY & SPECIFICATION
Let’s look into the build quality and specs of the Oculus Quest 2.
The headset comes in a nice grey white-ish colour weighing in a total of 503 grams, which is about 10% lighter than the previous version, with dimensions of 19.15 cm x 10.2 cm x 14.25 cm.
For storage options, it comes with 64GB for a casual gamer like me, or 256GB option if you’re an avid gamer, and has a 6GB RAM. Both panel type lens comes with a Single Fast-Switch IPS LCD display, with the resolution of 1832 × 1920 pixels per eye which was great.
What’s cool is that it also has a pretty high refresh rate at the default of 72Hz but can be configured to 60Hz and goes up to 90Hz.
It is also packed with Qualcomm®️ Snapdragon XR2 Platform, Octacore Adreno 650 GPU. The Quest 2 runs on the Oculus Mobile software, based on Android 10. It has no Google Play Services and uses a proprietary Oculus store for apps and games. It also supports playing PC VR games through Oculus link as well.
And the Quest 2 has four sensors in the front which allows you to move freely around in the VR world and your physical space. Behind the headset are the face mask and the lenses. Then there is the head strap that comes with the headset which also has a built-in speaker, so no need for external headphones or earphones.
Finally, it also supports Wi-Fi for wireless connectivity and Bluetooth 5.0.
On the headset itself, you will find a USB-C port to charge the headset, a headphones jack, the volume rockers and the power button.
SETUP
Alright, let’s dive into the setup. Firstly, you’ll need to charge up the headset using the power adapter and cable given. Meanwhile, you’ll need to download the Oculus app as you will need this for the initial setup. You can find the app on both Google Play Store and the Apple Store.
Now once it is all charged up, you’ll first turn it on by pressing and holding the power button for a few seconds. Then you’ll need to wear your Quest 2 headset and grab hold of your controllers. Inside you’ll need to pair your controllers where you’ll need to hit the back triggers and it should automatically find your headset. Then you’ll have the rest of the setup which you’ll just have to follow the steps accordingly like choosing your language, Wi-Fi, location and so on.
Then you’ll also get some tips on how to get the best visual clarity and how to adjust its lenses. To do that, you can move it left or right, there are 3 settings to choose from and it should be fitted right.
Before everything, safety first. You’ll need to create a “safe space” which Oculus calls it as the Guardian system that maps up to 20m x 20m play area. Basically, you simply point the controller to the ground of the space you’ll be playing in and draw the markers around you. This limits your movement from going overboard otherwise you’ll be banging everything in your house.
When that is done, you’ll be automatically brought to the VR world. If you get too close to the boundary of your play space, it will warn you and if just so happen you’re so immersed in the game and you walk past the boundary area, the cameras in front will show you back to your real-world – so yes, you’re safe!
That’s about it. You’ll then be brought to the Oculus home page where this is your main hub of the headset. The environment you’re in can be changed to about almost anything you like. From here, you can start downloading and playing the games you like, customize your avatar, connect with friends, Livestream or record your gameplay, browse the internet, watch YouTube, or even watch Netflix! Kind of all-rounder for this one headset.
AUDIO
Now for an audiophile like me, I always like to blast music in my ears. I’m pretty deaf (yeap I am, haha) Also, I like immersing myself in the virtual world, hence having a headphone is much recommended for a person like me. On the left side of the Quest, there is the headphones jack input for you to use. Great!
It’s Casting mode is pretty cool too. If you have guests around your house and while you’re playing or someone else is playing, you can stream your gameplay on to your TV by using a Chromecast or even to your mobile phone.
OTHER ACCESSORIES
Well, there are other accessories that you can get from Oculus as well to amplify your gameplay. I don’t have that in hands right now, but you can get the Quest 2 carrying case for protecting your headset which fits everything snugly.
There’s also the Quest 2 Fit Pack which includes two alternate facial interfaces and light blockers for users with low nose bridges and wider or narrower cheekbones.
Then there’s this, the VR cover facial interface and foam replacements to improve comfort and hygiene for every gaming or workout experience.
For those avid gamers who wants to immerse deeper in PC games, you can try out some awesome PCVR experiences designed to play successfully on the Quest 2. It’s the Oculus Link which is a high-quality USB cable for optimal performance.
But ensure your PC has these recommended specs INTEL i5 or AMD Ryzen 5 1500X or greater, with a memory of 8GB RAM or more with Windows 10 operating system. Plug that in and you’re good to go.
GAME EXPERIENCES
So in terms of my VR experience, first I tried the infamous Beat Saber and the experience was indeed very immersive, I am quite an active person, going to the gym every day and all, and I have to say that I had a decent “workout” when I was playing the game, and the latency of my movements in the game was almost non-existent.
Next, since I am a Star Wars fan, I played Vader Immortal Episode 3 and once again, all the actions and the swinging of the lightsaber felt super real and also responsive. Coupled with the sound within the game on the headset was also really cool as well.
I like the haptic feedback inside each controller as they strongly react when something exciting happens in gameplay.
And since the Oculus Quest is not ONLY about gaming so I tested out Jurassic World Blue where the overall experience of the dinosaur world was indeed out of this world where it is THE BEST experience you would ever get, walking around with dinosaurs.
BATTERY LIFE
In terms of battery life, it is packed with a huge 3,640 mAh battery which gives you about 2 hours if you’re in gaming mode, and up to 3 hours if you’re just watching movies or videos. When Quest 2 is at 0% battery life, it takes up to 2 hours to reach its 100% lifeline again.
CONCLUSION
In conclusion, my take of the Oculus Quest 2?
It’s an extremely good VR headset to start off with. Not being bulky, it’s super portable and affordable. While people all getting excited with the consoles coming out last year, before even thinking of getting those, I would recommend trying these as it is an experience of a whole new level!
It is one of the easiest setups as well for me, once I turn on and pair, within a few minutes I am ready to immerse myself in the VR world and the fact it is a portable and stand-alone headset, it is convenient to just bring it anywhere without having to worry about wires dangling off your head and tripping over them.
There are so many games, experiences, and entertainment in the game server, and across the board, I think it’s quite impressive, the display is also really great and what caught my attention was the hardware specs of the Oculus Quest 2. The Snapdragon processors are fast enough in smartphones and with this embedded in the headset itself, you’ll notice that game plays load fast, it keeps the frame rates high and also does not heat up easily.
Now if I had to just nit-pick a little, I would say that having white fabric, although I love white-coloured tech items, it has the tendency to get dirty, but other than that, I have no further complaints about that.
So… the Oculus Quest 2 by Facebook is surely one of the best experiences that you could get on a VR headset which is super portable that you can get right now.
All right guys, with this, do let me know what you guys think of the Oculus Quest 2 down at the comments section below. Cool right?
Once again, thank you Oculus for sponsoring this review!